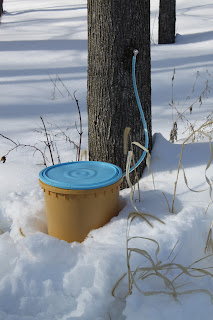
This past weekend, the Kopp family took in the joys of the Isanti County Fair. First stop: the open class displays, where county residents show off the products of their crafting, baking, artistry and gardening. Friends of ours took first place on some photography and vegetable categories - congratulations to Bridget & Dave!
Then with great anticipation, we headed over to the canned goods, and were honored to see two blue ribbons dangling from our entries! Our mushrooms beat out a beef jerky competitor in the "Dried Miscellaneous" category, and our best Grade A light amber reigned victorious in Maple Syrup. Next year we'll aspire to the purple Grand Champion ribbon. Thank you, Isanti County Fair Board!
Wednesday, July 31, 2013
Wednesday, May 1, 2013
99 Bottles of Syrup on the Wall… And 99 Stockpots to Wash
May 1 and it’s snowing again in Minnesota. We only wish we were joking. About the only thing this weather is good for
is finishing out the Maple Syrup Blogging Season. So let the bottling summary begin!
There are few tasks here at Kopp’s Crops that dirty
more dishes than filtering and bottling maple syrup, which is why we save up a
few days’ worth of boiling output before we bottle. That means we’ve got three or four pots
dirtied up before we even start – the pots in which the syrup was finished
& stored. The full syrup pots go
back on the stove to heat, partly as an additional pasteurization step, partly
just to make the syrup less viscous and runnier so it flows through the filters
more quickly. Our filters are housed in
a straining pot that started its life as a regular old stockpot, but now has
holes drilled in the bottom so the filtered syrup can drip through the holes
into yet another clean pot (or three) waiting below.
Finally filtered into a second round of clean
stockpots, the syrup is once again heated to 200 degrees to ensure that the
syrup will be hot enough to make our tamper-proof plastic caps seal properly. Then we pour the steaming hot syrup carefully….carefully…
carefully into an insulated coffee pot with a spigot for easy bottle filling. Quite the upgrade from last year’s “ladle
& funnel & try to keep the spilling to a minimum” method! Each bottle is filled, wiped and capped, then
set aside to cool before labeling. We’ve
been blessed with a bumper crop of syrup this year (99 bottles just in the first bottling batch!, so we’re swimming in beautiful
bottles of sweet syrup. The sidebar on
the right shows the sizes and grades we have for sale. When you’re ready to order, just give a yell –
we’ll be in the kitchen washing out the mountain of stockpots!
Sunday, April 21, 2013
The Finer Points of Finishing: Part 2
Once the clear sap has boiled the day away and whittled away
into an inch of golden goodness in the bottom of the boiling pan, it’s time to
drain it into one of our big canning pots.
Thankfully there’s a handy-dandy spigot in the corner to make the job
easier. After our most recent 12-14 hour
boils, we’ve drained out about four gallons of near-syrup at this stage. Then it’s off to the turkey fryer to boil off
the last gallon of water. The ring of the fryer
burner is a perfect fit for our canning pots, and the propane burner is much
easier to control. Also perfect for
roasting hot dogs, if a person needs a little protein to balance out the sugar. Plus, it keeps us from making a mess of the
kitchen stove. On the burner, the syrup
gently boils for quite a while with little attention, but when it gets close to
finished, watch out! That baby can boil
over in a heartbeat. Sadly, we know this
from experience.
The syrup is officially finished when it reaches the magical
66% sugar content, or boils at seven degrees above the boiling temperature for
water. In most cases that would be the
expected 219 degrees, unless the barometric pressure is all wonky. For those of you who have been following the
April weather in Minnesota this year, we think you’d agree there may have been
some barometric wonkiness. So rather
than rely on a thermometer, we let our hydrometer tell us when it’s quittin’
time. The hydrometer measures the
density of the syrup, to give us a more precise measure of the sugar
content. We dip our handled hydrometer
cup into the hot syrup and let the hydrometer float gently inside. When the red line is visible above the syrup
line in the cup, we call it a day. And
thank our lucky stars we avoided another sticky syrup spillover.
Wednesday, April 17, 2013
The Finer Points of Finishing, Part 1
So after five or so hours of boiling, our 40 gallons of sap has
magically turned into a gallon of syrup, right?
Oh, if only. To “finish” the
syrup to the proper 66% sugar content in the pan would be to risk overshooting
the evaporation and scorching the syrup.
Thus rendering the syrup inedible, and leaving the evaporator operator
sobbing in the corner of the sugar shack in the fetal position. Nobody wants to see that. So the trickiest part of the entire syrup
operation might be deciding when to pull the pan off the wood stove and transfer
the near-syrup to a large pot to be finished over a more controlled heat
source. Pull the pan off too early, and
we waste lots of time boiling off water we could have boiled in the more
efficient flat pan. Pull it off too late
and, yup, we’ll be playing “Taps” for our fallen batch of syrup.
Maple Sap Streaming into the Boiling Pan |
Sunday, April 14, 2013
Boil, Baby, Boil!
First of all, we want to be clear. Even though this incredibly long stretch of
cold weather has extended our season and will give us our biggest syrup haul ever, we
still want spring to arrive NOW just as much as anyone else in Minnesota! We’re willing to call it quits
on sap collection. We’re ready for warmer weather. Any day now, thanks!
Sap Delivery & Preheating Mechanism |
But in the meantime, when the world gives us sap, we make
syrup! No matter how cold it gets
inside, it’s toasty warm inside the Sugar Shack. To keep the sap at a rolling boil, we add wood
to the stove every 10-12 minutes. We use a mix of oak and maple. Nope, not for a
smoky flavor, but because our oak is drier and contains more BTUs so it burns hotter, while the maple is
wetter and burns longer. This keeps the
fire burning at 750 to 800 degrees Fahrenheit, as measured by the thermometer
mounted on our smokestack. The
thermometer has an ominous name; “burn indicator” is stamped on the
bottom of it. Boil,
baby boil… syrup inferno! No, no
infernos, please – that’s why we have a panel of cement board mounted between the stove
and the back wall, and a fire extinguisher mounted prominently near the door of
our Sugar Shack. Safety first, syrup
second!
To make sure the syrup keeps boiling steadily as we add more
sap to the pan, we use copper tubing to carry the sap from our 55 gallon drums
into the pan. The tubing has a valve like our house’s plumbing, where we can adjust the speed of the sap
flow. And the copper wraps around the
smokestack twice, so that the sap is already preheated a bit by the time it
goes streaming into the pan. During the
height of the boil, we try to adjust the flow to keep about 3 inches of boiling
liquid in the pan for optimal evaporation.
With this setup, we can boil the excess water off 50 gallons of sap in about 6 hours. Or about fifty rounds of adding wood to the fire. Not that we're counting.
Saturday, April 6, 2013
Quicker Collection
See that beautiful photo there? That nearly full bucket of fresh,
begging-to-be-boiled sap? Yes, that’s
what we’ve been waiting for. The sap run
is at its peak, and we aim to collect every available drop. A couple of years
ago, the bottleneck of our syrup operation was the boiling. We solved (or partially solved) that issue by
upgrading our stove.
So now our bottleneck is sap collection.
The 55 gallon plastic drum bungee corded onto a wagon (aka the “collection cart”), towed by our four
wheeler just isn’t giving us the efficiency we’re
looking for. There’s still the stopping
& dismounting from the four wheeler at every tree. The unhooking of the bucket, the dumping of
the sap into a larger 5 gallon bucket, the rehanging of the bucket, the
replacing of the lid that has inevitably fallen into the snow at some point in
the process. The trudging through the
snow to the next tree, the dumping of 2-3 trees’ worth of sap into the drum,
the remounting of the four-wheeler.
Repeat. Repeat. Repeat for one hundred trees.
But we’ve seen the future, and the future is plastic. Plastic tubing, to be exact. With some assistance from good old fashioned gravity. Most of our land is pretty flat, but we do
have a nice slope on the southeast side that we’re using as a trial run for sap-collecting
tubing. Before the season started, we
attached a length of one-inch diameter plastic tubing to a series of mature
maples. At the top of the slope, the
tubing is attached higher on the tree, and by the bottom of the slope it’s only
a couple feet off the ground. A carpenter’s
level assured us that we had a consistent downward slope of tubing with no
level spots for sap to pool. Then once
it was time to tap the trees, instead of hanging a bucket from a metal spline on each tree along the slope, we used plastic taps. The plastic taps have small tubes attached to
them that splice into the main tubing, giving the sap a clear path out of the tree, down toward lower ground.
At the bottom of this sap water slide?
One of those beautiful blue 55 gallon drums, already partially full of clear, pure maple sap. Sunday, March 31, 2013
Easter Eggs
We're "dyeing" to show you how we spent the afternoon yesterday! One egg-dye kit, six juice glasses, two preschoolers, and thirteen hard-boiled eggs. We didn't start with this unlucky number; we started with sixteen. Three were so excited to be dyed that they could burst (and did) in the pan. And some of our eggs had a head start on the dyeing. Six of our laying hens lay brown eggs and two lay white eggs, so of today's eggs, eight were white, two were brown, and four were green. Yes, green! Dr. Seuss wasn't quite as far-out there as you thought (although we'd still recommend staying away from green ham). We don't have green-egg-layers of our own, but one of our friends thought the girls would enjoy having some green eggs and sent a few over. The multi-colored baker's dozen made for some interesting egg-dye outcomes that we thought we'd share with you. Before you judge the craftsmanship of the dye job, though, please remember - the primary artists were ages two and a half and four!
Happy Easter from the hens (and humans) of Kopp's Crops!
Our Easter eggs, prior to dyeing: seven white, four green and two brown. |
The white eggs turned out about how you'd expect - pretty pastels. |
The brown eggs did okay in the darker color dye. Starburst breakage pattern courtesy of an overexcited two and a half year old. |
Saturday, March 30, 2013
Nectar of the Gods
The trees are dripping!
The trees are dripping! The sap
is finally flowing and we couldn’t be sappier… er, happier! We’ve tapped one hundred and thirty trees
this year, so 2013 tops our tapping tally to date. Sadly, many of the buckets are still dry and
sap-free, especially the ones deeper in the woods where the temperatures still
struggle to get above freezing. But the
ones that have sap in them are a beautiful sight. It may look like plain old water, and even
taste like it, but it is the nectar of the gods. Or at least the nectar of the god of pancakes,
IHOPysus.
The sap's sugar content is its most important quality.
Red maples, which make up the majority of our tapped trees, typically
have a sugar content of 2.0-2.5%, while sugar maples have a slightly higher
2.5-3.0% sugar content. This makes the
standard sap-to-syrup ratio about 43:1.
Yes, over 40 gallons of sap just to walk out of the boiling shack with
a single gallon of syrup! Sugar content
in the harvested sap declines until it’s boiled, so we boil as often as
possible to maximize our syrup. But we
also try not to boil until we’ve collected over 40 gallons of sap. Our boiling pan is two feet by four feet, so
it takes almost two gallons of boiling syrup just to keep the pan covered and not scorching.
After our first sap collection yesterday we used a hydrometer
to test the sugar content of our haul. One
tree pumped out a whopping 4% sugar - sweet!
But by the time we collected from all the trees, the average sugar
content was 2.3%. Well within normal
range, and with fifty gallons of sap in our barrel, well worth firing up the
wood stove for our first boil of the season.
The fruit of our labors? One
gorgeous gallon of golden goodness. All
hail IHOPysus!
Wednesday, March 27, 2013
Cute Chicks
Is there anything cuter than a baby chick? How about a whole flock of baby chicks? Just in time for Easter, we've got a few new residents at Kopp's Crops. And by few, we mean about 125 of them!
Sunday, March 17, 2013
Waiting for Spring to Spring Forth
Waiting, waiting, waiting… we’re still waiting for sap. We tapped all our trees on Wednesday, when it
looked like the temperatures would creep above freezing. Not so much.
All we’ve got to show for our first few days are a couple of buckets
with a half-inch of frozen sap in the bottom.
It’s always a balancing act – if we tap too early (as we apparently did
this year), we risk having the holes in the trees heal up before all the available
sap is collected – the trees actually start healing the minute they’re tapped. But if we tap too late and miss the beginning
of the sap run, we’ll miss out on the delicately-flavored light amber maple
syrup that those first days will bring.
Our other sugar sources, the honey bees, are not happy about
the lingering freezing temperatures, either.
We’re not really worried about them freezing in their hives, since we
wrapped all the boxes with black tar paper to keep the wind out and the heat in. And even on a sub-zero day, a cluster of bees
and their body heat can reach 80 degrees.
But the bees still leave the hive for their periodic “cleansing flights,”
also known as “taking a little bee dump outside so they don’t turn the hive
into giant latrine.” Some of those bees
won’t survive out in the cold long enough to make it back to the hive.
The bees that don’t freeze their little bee butts off
outside the hive are probably getting a tad hungry by now. To keep our honey-creators alive through the
winter, we left 60-70 pounds of honey in each hive to provide enough sustenance
until spring. But with winter continuing
to stretch out, we’ve had to supplement their winter stash with some sugar
water. When they suck the sugar water
out of the feeder, they’re tricked into thinking the spring nectar is
flowing. Oh, if only we could trick ourselves into thinking spring is so
close!
Sunday, March 10, 2013
Easing Into the Season
When days are warm but
nights still freeze
The sap starts flowing
in the trees…
For the past few weeks, when 10:14pm rolls around, you’ll
find us on the couch, eyeballs glued to the TV, fingers crossed, waiting for just the right weather report. The maple sap run starts when the daytime
highs climb a few degrees above freezing for a few days in a row– the sap rises
from the roots toward the warm, sunny branches.
But when the air temperature drops back below freezing at night, it
flows back down to hide out in the warmth of the ground. Up and down, up and down. Except for that bit that flows by our taps and
into our buckets.
Since we haven’t seen that sought-after five-day forecast yet,
we’ve just been easing into the season so far. First, we cleared out the Sugar Shack and
brought the equipment out of hibernation.
Buckets, taps, storage drums, and the big kahuna: the boiling pan. Everything
needed to be completely sanitized, to ensure that all the sugar-eating bacteria
were eliminated. The taps were small
enough that we could boil them to get them squeaky clean. Everything else got a good scrubbing with
bleach and elbow grease. The wood
boiling stove just needed a good once-over to get rid of the spiders and other
creepy crawlies that made their winter home there. Then we stacked a full cord of dried, split
wood neatly beside the Sugar Shack. We
tapped the tree closest to the house as a tester tree. And then, we waited. And watched the weather report. And waited some more.
Saturday, we just couldn’t stand the waiting any more. With daytime temperatures projected to be
right about freezing this week, we decided to tap the first 25 trees. We chose a stand of trees on the southeast
slope where it’s a little sunnier, and maybe a little warmer. And now we wait again, for the first flow of
the sweet sap of 2013…
Sunday, February 24, 2013
Feeling Peckish
We humans of Kopp’s Crops have a serious case of Cabin Fever
with a side of Spring Fever. But we
think the chickens are feeling it even more acutely. After a winter of being cooped up (pun
intended) inside, they’re feeling a little peckish. As in, they’re pecking at each other. A couple of the hens who fall to the bottom
of the proverbial pecking order (yes, a phrase that did indeed originate in the
chicken universe) are sporting some feather-free bald spots above their tails. Hopefully as the weather warms up and they
get outside more to stretch their wings, their appetites for each others’
tailfeathers will wane. If not, some
chicken coats may be in order.
Seriously. You can actually buy
peck-proof coats for chickens!
The pecking really took off a couple of weeks ago, when the
weather dropped into the sub-zero, egg-freezing zone. Our hens stayed comfortable with their thick
winter feathers and the collective chicken body heat, but the eggs they laid in
the colder corners of the coop didn’t fare so well. Of the five or six eggs laid each day by our
eight hens, we were lucky to retrieve one before they froze and split their
shells. Then all the sudden, those
frozen eggs started sporting mysterious, jagged holes. The hens were pecking at their own eggs, as
if they were in some twisted poultry version of the Donner party.
Fearing the ongoing loss of future omelets, we took a
two-pronged approach to exterminate the egg-pecking. First, we dug out the plastic eggs from the
girls’ Easter baskets to use as decoys.
Go ahead, ladies, let’s see you try to peck through that tough
plastic! Then we filled all the
pre-pecked real eggs with yellow mustard, which chickens apparently detest. Yes, dear hens, it may just look like egg
yolk, but trust us – it’s kryptonite to you! It took about five days, but they finally
tired of the pecking prevention measures and started leaving the eggs intact,
just in time for the winter warm-up that allowed us to once again enjoy fresh
(unfrozen) eggs!
Sunday, January 13, 2013
The Science of Sausage-Making
It has been said for decades “you don’t really want to know how the sausage is made.” Well, here’s your opportunity to find out how our venison sausage is made, with nary a stomach-churning description to be found. Unless you’re vegetarian, of course. But if you are, we probably lost you at the title of the post, didn’t we? For those still with us, read on for a peek behind the curtain (or into the grinder).
The secret to venison sausage is… pork. Yes, pork. True, venison alone would make a nice low-fat sausage, but it would also be a dry, tasteless sausage. Sausages need fat for flavor and juiciness, but what little fat venison has just tastes nasty. Really gross. So before we grind our venison for the sausage, we trim all the fat off. Enter the pork. Most venison sausage recipes call for a mix of venison, pork fat, and pork lean, with the pork fat & lean at a 1:1 ratio. We trade off a little of the flavor and juiciness for a lower-fat sausage, so we buy pork butt roasts that are probably closer to 75% lean. We grind the meats separately, then plop them into a giant plastic tub, 25 pounds of meat at time. Next, the spices, which get mixed with water into a spicy slurry, so that they mix more evenly with the meat.
For our favorite wild rice bratwurst, we soften up 16 oz. of wild rice by pouring boiling water over it, let it cool, pour off the water, and repeat the process two more times. After the meat, spices, and wild rice are well-mixed by hand, we load the mixture into a sausage stuffer, where we pump it into natural casings made from beef intestines. (Ok, we lied. That may have grossed some of you out…sorry! We promise, that’s the last time.) We twist the casings every six inches to form the individual sausages, creating a long, somewhat festive meat garland to adorn our freezer for the coming months (in tidy vacuum-sealed packages of four).
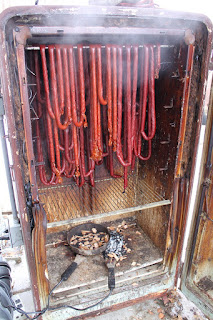
We use manufactured collagen casings for our smoked snack sticks (think Slim Jims, only larger in diameter, with a fraction of the ingredients, and way, way, way tastier), for which we use 60% venison, 40% pork, and a different spice blend. Since these sausages are eaten cold or room temperature, we have to add cure (sodium nitrite) to inhibit the growth of microorganisms, particularly the ones that cause botulism. Cure is also what gives sausages their trademark pink/red color and adds some distinctive flavor. After stuffing the casings, we load them into our refrigerator smoker. Yes, you read that right. Our smoker is made out of 1940’s refrigerator. More on that in an upcoming post. We smoke the sausages at 125 degrees for five hours, then at 170 until they’re fully cooked with an internal temperature of 156 degrees, then cool and freeze them.
This year we tried making hotdogs for the first time! We made them the same way we made the snack sticks (but with larger-diameter casings and yet another spice blend), but smoked them for only an hour and a half at 125 degrees before raising the temperature. After they reached the requisite 156 degrees, we gave them the full Minnesota treatment – we pulled them from their sauna and threw them into a refreshing ice bath to cool them down quickly and preserve some of the internal moisture. Since the collagen casings are kind of chewy compared to the texture of the wieners, we peeled them off before freezing them. The final tally: 100 wild rice bratwurst, 25lbs of chipotle snack sticks, 13 pounds of hot dogs, and a fully-stocked freezer full of savory sausage to go with our cellar full of sauerkraut!
Subscribe to:
Posts (Atom)