

Wednesday, March 27, 2013
Cute Chicks
Is there anything cuter than a baby chick? How about a whole flock of baby chicks? Just in time for Easter, we've got a few new residents at Kopp's Crops. And by few, we mean about 125 of them!


Sunday, March 17, 2013
Waiting for Spring to Spring Forth
 Waiting, waiting, waiting… we’re still waiting for sap. We tapped all our trees on Wednesday, when it
looked like the temperatures would creep above freezing. Not so much.
All we’ve got to show for our first few days are a couple of buckets
with a half-inch of frozen sap in the bottom.
It’s always a balancing act – if we tap too early (as we apparently did
this year), we risk having the holes in the trees heal up before all the available
sap is collected – the trees actually start healing the minute they’re tapped. But if we tap too late and miss the beginning
of the sap run, we’ll miss out on the delicately-flavored light amber maple
syrup that those first days will bring.
Waiting, waiting, waiting… we’re still waiting for sap. We tapped all our trees on Wednesday, when it
looked like the temperatures would creep above freezing. Not so much.
All we’ve got to show for our first few days are a couple of buckets
with a half-inch of frozen sap in the bottom.
It’s always a balancing act – if we tap too early (as we apparently did
this year), we risk having the holes in the trees heal up before all the available
sap is collected – the trees actually start healing the minute they’re tapped. But if we tap too late and miss the beginning
of the sap run, we’ll miss out on the delicately-flavored light amber maple
syrup that those first days will bring.
Our other sugar sources, the honey bees, are not happy about
the lingering freezing temperatures, either.
We’re not really worried about them freezing in their hives, since we
wrapped all the boxes with black tar paper to keep the wind out and the heat in. And even on a sub-zero day, a cluster of bees
and their body heat can reach 80 degrees.
But the bees still leave the hive for their periodic “cleansing flights,”
also known as “taking a little bee dump outside so they don’t turn the hive
into giant latrine.” Some of those bees
won’t survive out in the cold long enough to make it back to the hive.
The bees that don’t freeze their little bee butts off
outside the hive are probably getting a tad hungry by now. To keep our honey-creators alive through the
winter, we left 60-70 pounds of honey in each hive to provide enough sustenance
until spring. But with winter continuing
to stretch out, we’ve had to supplement their winter stash with some sugar
water. When they suck the sugar water
out of the feeder, they’re tricked into thinking the spring nectar is
flowing. Oh, if only we could trick ourselves into thinking spring is so
close!
Sunday, March 10, 2013
Easing Into the Season
When days are warm but
nights still freeze
The sap starts flowing
in the trees…
For the past few weeks, when 10:14pm rolls around, you’ll
find us on the couch, eyeballs glued to the TV, fingers crossed, waiting for just the right weather report. The maple sap run starts when the daytime
highs climb a few degrees above freezing for a few days in a row– the sap rises
from the roots toward the warm, sunny branches.
But when the air temperature drops back below freezing at night, it
flows back down to hide out in the warmth of the ground. Up and down, up and down. Except for that bit that flows by our taps and
into our buckets.
Since we haven’t seen that sought-after five-day forecast yet,
we’ve just been easing into the season so far. First, we cleared out the Sugar Shack and
brought the equipment out of hibernation.
Buckets, taps, storage drums, and the big kahuna: the boiling pan. Everything
needed to be completely sanitized, to ensure that all the sugar-eating bacteria
were eliminated. The taps were small
enough that we could boil them to get them squeaky clean. Everything else got a good scrubbing with
bleach and elbow grease. The wood
boiling stove just needed a good once-over to get rid of the spiders and other
creepy crawlies that made their winter home there. Then we stacked a full cord of dried, split
wood neatly beside the Sugar Shack. We
tapped the tree closest to the house as a tester tree. And then, we waited. And watched the weather report. And waited some more.

Saturday, we just couldn’t stand the waiting any more. With daytime temperatures projected to be
right about freezing this week, we decided to tap the first 25 trees. We chose a stand of trees on the southeast
slope where it’s a little sunnier, and maybe a little warmer. And now we wait again, for the first flow of
the sweet sap of 2013…
Sunday, February 24, 2013
Feeling Peckish
 We humans of Kopp’s Crops have a serious case of Cabin Fever
with a side of Spring Fever. But we
think the chickens are feeling it even more acutely. After a winter of being cooped up (pun
intended) inside, they’re feeling a little peckish. As in, they’re pecking at each other. A couple of the hens who fall to the bottom
of the proverbial pecking order (yes, a phrase that did indeed originate in the
chicken universe) are sporting some feather-free bald spots above their tails. Hopefully as the weather warms up and they
get outside more to stretch their wings, their appetites for each others’
tailfeathers will wane. If not, some
chicken coats may be in order.
Seriously. You can actually buy
peck-proof coats for chickens!
We humans of Kopp’s Crops have a serious case of Cabin Fever
with a side of Spring Fever. But we
think the chickens are feeling it even more acutely. After a winter of being cooped up (pun
intended) inside, they’re feeling a little peckish. As in, they’re pecking at each other. A couple of the hens who fall to the bottom
of the proverbial pecking order (yes, a phrase that did indeed originate in the
chicken universe) are sporting some feather-free bald spots above their tails. Hopefully as the weather warms up and they
get outside more to stretch their wings, their appetites for each others’
tailfeathers will wane. If not, some
chicken coats may be in order.
Seriously. You can actually buy
peck-proof coats for chickens!
The pecking really took off a couple of weeks ago, when the
weather dropped into the sub-zero, egg-freezing zone. Our hens stayed comfortable with their thick
winter feathers and the collective chicken body heat, but the eggs they laid in
the colder corners of the coop didn’t fare so well. Of the five or six eggs laid each day by our
eight hens, we were lucky to retrieve one before they froze and split their
shells. Then all the sudden, those
frozen eggs started sporting mysterious, jagged holes. The hens were pecking at their own eggs, as
if they were in some twisted poultry version of the Donner party.
Fearing the ongoing loss of future omelets, we took a
two-pronged approach to exterminate the egg-pecking. First, we dug out the plastic eggs from the
girls’ Easter baskets to use as decoys.
Go ahead, ladies, let’s see you try to peck through that tough
plastic! Then we filled all the
pre-pecked real eggs with yellow mustard, which chickens apparently detest. Yes, dear hens, it may just look like egg
yolk, but trust us – it’s kryptonite to you! It took about five days, but they finally
tired of the pecking prevention measures and started leaving the eggs intact,
just in time for the winter warm-up that allowed us to once again enjoy fresh
(unfrozen) eggs!
Sunday, January 13, 2013
The Science of Sausage-Making
It has been said for decades “you don’t really want to know how the sausage is made.” Well, here’s your opportunity to find out how our venison sausage is made, with nary a stomach-churning description to be found. Unless you’re vegetarian, of course. But if you are, we probably lost you at the title of the post, didn’t we? For those still with us, read on for a peek behind the curtain (or into the grinder).
The secret to venison sausage is… pork. Yes, pork. True, venison alone would make a nice low-fat sausage, but it would also be a dry, tasteless sausage. Sausages need fat for flavor and juiciness, but what little fat venison has just tastes nasty. Really gross. So before we grind our venison for the sausage, we trim all the fat off. Enter the pork. Most venison sausage recipes call for a mix of venison, pork fat, and pork lean, with the pork fat & lean at a 1:1 ratio. We trade off a little of the flavor and juiciness for a lower-fat sausage, so we buy pork butt roasts that are probably closer to 75% lean. We grind the meats separately, then plop them into a giant plastic tub, 25 pounds of meat at time. Next, the spices, which get mixed with water into a spicy slurry, so that they mix more evenly with the meat.
For our favorite wild rice bratwurst, we soften up 16 oz. of wild rice by pouring boiling water over it, let it cool, pour off the water, and repeat the process two more times. After the meat, spices, and wild rice are well-mixed by hand, we load the mixture into a sausage stuffer, where we pump it into natural casings made from beef intestines. (Ok, we lied. That may have grossed some of you out…sorry! We promise, that’s the last time.) We twist the casings every six inches to form the individual sausages, creating a long, somewhat festive meat garland to adorn our freezer for the coming months (in tidy vacuum-sealed packages of four).
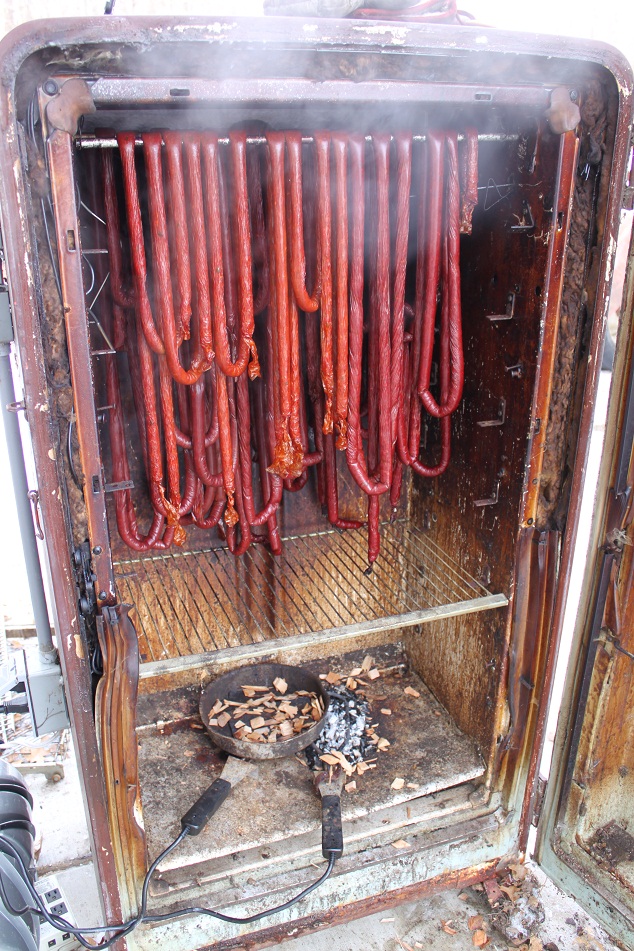 We use manufactured collagen casings for our smoked snack sticks (think Slim Jims, only larger in diameter, with a fraction of the ingredients, and way, way, way tastier), for which we use 60% venison, 40% pork, and a different spice blend. Since these sausages are eaten cold or room temperature, we have to add cure (sodium nitrite) to inhibit the growth of microorganisms, particularly the ones that cause botulism. Cure is also what gives sausages their trademark pink/red color and adds some distinctive flavor. After stuffing the casings, we load them into our refrigerator smoker. Yes, you read that right. Our smoker is made out of 1940’s refrigerator. More on that in an upcoming post. We smoke the sausages at 125 degrees for five hours, then at 170 until they’re fully cooked with an internal temperature of 156 degrees, then cool and freeze them.
This year we tried making hotdogs for the first time! We made them the same way we made the snack sticks (but with larger-diameter casings and yet another spice blend), but smoked them for only an hour and a half at 125 degrees before raising the temperature. After they reached the requisite 156 degrees, we gave them the full Minnesota treatment – we pulled them from their sauna and threw them into a refreshing ice bath to cool them down quickly and preserve some of the  internal moisture. Since the collagen casings are kind of chewy compared to the texture of the wieners, we peeled them off before freezing them. The final tally: 100 wild rice bratwurst, 25lbs of chipotle snack sticks, 13 pounds of hot dogs, and a fully-stocked freezer full of savory sausage to go with our cellar full of sauerkraut!
 internal moisture. Since the collagen casings are kind of chewy compared to the texture of the wieners, we peeled them off before freezing them. The final tally: 100 wild rice bratwurst, 25lbs of chipotle snack sticks, 13 pounds of hot dogs, and a fully-stocked freezer full of savory sausage to go with our cellar full of sauerkraut!
Monday, September 10, 2012
Sauerkraut Season
It was the best of times, it was the wurst of times… it was sauerkraut season.
Sauerkraut is among the most unpleasant canning tasks we have. It is definitely the stinkiest. In a nutshell: we take an inherently unpleasant-smelling vegetable and let it ferment in our garage for three weeks. We start by shredding the cabbage with an old-school, antique three-blade kraut cutter into a 10-gallon crock. After the crock is completely full of shredded cabbage, we pack it down with a wooden ram until the top is covered with cabbage juice. Then we sprinkle in a handful of salt – a quarter cup or so. Then we fill the crock to the top again, tamp it until it’s under cabbage-water, salt it. Repeat. Repeat. Repeat until the crock is full. Then we set it aside to ferment for three weeks. Yes, that’s twenty-one days of stinkiness in our garage. Hey, at least we’re smart enough not to try to do it in the house! Over the fermentation period, the sugar in the cabbage turns to lactic acid, giving the sauerkraut its sauer-ness. Normally we’d actually let it sit there for four weeks, but this summer’s heat sped up the fermentation process.
The most important part of sauerkraut success (aside from making sure we have enough salt – mmmmm… salt…) is making sure no kraut is exposed to the air. Air + sauerkraut = a stinky, moldy mess. Ick. We’ve found that the best way to keep the air out is to cover the cabbage with a white kitchen trash bag full of water (double- or triple-bagged to avoid leakage). The water not only makes sure that the plastic is sealed into all the cabbage/crockery crevices to keep out the drafts, but it also puts some weight on the kraut to keep it submerged in the cabbage water for more even fermentation.

Sauerkraut is preservation method agnostic – frozen or canned, it tastes about the same to us. Since canned foods usually last longer than frozen ones, we decided to can the first 36 pints. But after those four batches, we were a little “sauered” on the canning, so we froze the rest, and we’ll just plan on using it first. Now that we have all these pretty jars of kraut, Jason’s looking forward to deer season to get some venison sausage to go with them!
Friday, August 10, 2012
Doing the Can-Can
Sorry, folks… we know it’s been a long time since we posted. But right now everything in the garden is
going gangbusters, and we’re working night and day to get it all picked and
sold, frozen, canned, dried or given away. Nothing hurts a farmer’s soul worse than
perfectly good vegetables going to waste.
So this month, we’ve been doing the can-can. Can we can it all? Yes, we can.
And can. And can. Our houseguests last week (Michelle’s
parents) even got conned into canning with us!
 Finally, today was tomato juice day. A motorized juicer made short work of a table
full of tomatoes – way faster than our old hand-cranked food mill. Tomatoes have higher acid, and since acid kills the
spores that produce the botulism toxin, we can safely hot water bath our juice
by submerging the jars in a huge pot of boiling water for 40 minutes. It’s a lot faster than pressure-canning because
we don’t have to wait for all the pressure to release before taking
out the jars and starting the next batch.
But over the decades, tomato varieties
have been bred to a lower level of acidity, so we add some lemon juice to each
jar just to be safe; there’s no reason to take chances!
Finally, today was tomato juice day. A motorized juicer made short work of a table
full of tomatoes – way faster than our old hand-cranked food mill. Tomatoes have higher acid, and since acid kills the
spores that produce the botulism toxin, we can safely hot water bath our juice
by submerging the jars in a huge pot of boiling water for 40 minutes. It’s a lot faster than pressure-canning because
we don’t have to wait for all the pressure to release before taking
out the jars and starting the next batch.
But over the decades, tomato varieties
have been bred to a lower level of acidity, so we add some lemon juice to each
jar just to be safe; there’s no reason to take chances!
We started off our canning marathon with green beans. We grow stringless varieties called Bush Lake
Blue and Slenderette so we don’t actually have to “string” them. We just break off the tough stem end and break them into inch-long pieces so they fit in the jars better. Green beans are a low-acid vegetable, so they
have to be pressure-canned in a canner that can process jars under 10 lbs of
pressure, to make sure all botulism spores are killed (it takes 240 degree heat
to kill them, not just the 212 degrees of normal boiling water). We hot-pack our beans, meaning we heat the
beans before they go into the jars, then fill them to 1” below the rim with
boiling water. A teaspoon of salt, a lid
with the seal softened in hot water, and a canning ring screwed on “finger
tight” to keep the lid in place during processing, and we’re ready to carefully
place the jars in the canner. After ten
minutes of off-gassing the steam inside the canner, we can put a weight on
the canner to start bringing it up to pressure.
The beans’ twenty-five minute timer starts when the dial shows we’ve
gotten to 10 lbs of pressure.
You could say we’re going in ascending order of messiness, because yesterday we tackled sweet corn. Naturally, the kernels have to be cut off the cob before they can be put in the jar, and it’s not a neat process. (Note to selves: next time, sweep up errant corn kernels from the floor before picking up the 22-month-old from daycare. “Yummy! Corn!” She was too fast to stop.) We also pressure-can the corn, but we “cold-pack”the jars with raw kernels before adding our boiling water. It increases the processing time, but we think it gives us crispier kernels when we open the jars in winter.
You could say we’re going in ascending order of messiness, because yesterday we tackled sweet corn. Naturally, the kernels have to be cut off the cob before they can be put in the jar, and it’s not a neat process. (Note to selves: next time, sweep up errant corn kernels from the floor before picking up the 22-month-old from daycare. “Yummy! Corn!” She was too fast to stop.) We also pressure-can the corn, but we “cold-pack”the jars with raw kernels before adding our boiling water. It increases the processing time, but we think it gives us crispier kernels when we open the jars in winter.
 Finally, today was tomato juice day. A motorized juicer made short work of a table
full of tomatoes – way faster than our old hand-cranked food mill. Tomatoes have higher acid, and since acid kills the
spores that produce the botulism toxin, we can safely hot water bath our juice
by submerging the jars in a huge pot of boiling water for 40 minutes. It’s a lot faster than pressure-canning because
we don’t have to wait for all the pressure to release before taking
out the jars and starting the next batch.
But over the decades, tomato varieties
have been bred to a lower level of acidity, so we add some lemon juice to each
jar just to be safe; there’s no reason to take chances!
Finally, today was tomato juice day. A motorized juicer made short work of a table
full of tomatoes – way faster than our old hand-cranked food mill. Tomatoes have higher acid, and since acid kills the
spores that produce the botulism toxin, we can safely hot water bath our juice
by submerging the jars in a huge pot of boiling water for 40 minutes. It’s a lot faster than pressure-canning because
we don’t have to wait for all the pressure to release before taking
out the jars and starting the next batch.
But over the decades, tomato varieties
have been bred to a lower level of acidity, so we add some lemon juice to each
jar just to be safe; there’s no reason to take chances!
It has been said that there is no sweeter summer sound than
the laughter of children, the waves of the ocean, the chirp of crickets or <insert your favorite summer sound here>. For us, it’s that little metallic “tink!”
that a jar makes when its lid seals completely, as if to say “You can relax now
– it worked!”
Subscribe to:
Posts (Atom)